Fishing is the main gameplay mechanic of Fishing: Barents Sea.
Types of fishing
There are four different ways to do fishing in the game: longlines using baited hooks, setting nets and doing pelagic and bottom trawling at the open sea.
Longline 
Longlines are long fishing lines with many branch lines with and hundreds baited hooks attached to them, and the line itself attached to a buoy. Longlines can be left for 4 to 48 hours before being collected, with 18 to 24 hours being the best time.
To harvest a longline, drive to its location on the minimap, and position your boat such that the buoy is inside of the half-circle that appears from your boat when you get close, then use your boat's winch to pull the line in, collecting the fish as it does. You will enter a mini-game where a circle will appear on the fish, shrinking down to a dot and expanding back out to full size. You want to click the left mouse button when the circle is as small as possible. If you click while the circle is pink, or if it expands back out to full size, you will lose the fish.
Long lines must be re-baited at port between uses.
Baits
Longlines can be baited with different types of bait. Each type of bait has a different chance at catching specific fish types. This allows the player to target specific fish types through the use of the correct baits when trying to catch a certain type of fish for missions, profit or to fill a quota. Different types of baits have different cost and is calculated based on how many hooks there is on the line and what type of bait is used.
See the bait comparison tables for bait types.
Net 
Description
Nets are strung between two buoys and require no bait. Instead simply waiting for fish to swim into them.
Currently there are two boats that can be upgraded to use nets for fishing; Sjarken & Vibeke Cathrin.
Using nets also requires you to have a minimum of 1 crew member who will then assist the player with pulling the net onboard the boat. If your boat has room for two crew members you can use two crew to pull your net instead of doing it yourself.
If the player is pulling up the net without using two crew members to do it then it will start a mini-game.
Setting the net
Setting the net is as simple as sailing to any location where you want to set it and then press "Set Gear" and select the net in the bottom-left menu while in 3rd person view.
When setting the net a small mini-game is started with a horizontal bar and an indicator. The goal of this mini-game is to keep the indicator in the center. If the indicator is starting to move towards the left side you must start turning your ship towards the left to prevent the indicator from getting to the edge of the horizontal bar. If the indicator gets to the end of the bar then the net starts taking damage.
Pulling the net
Once the player has started pulling the net the fish will be pulled up with the net and onto the net table. An image of a net will appear on the screen and once a fish is in front of the player one of the letters W, A, S or D will randomly appear next to this net. The player must then quickly press that key on their keyboard.
E.g. if an A appears on screen the player must press the A key. If a W appears then W must be pressed.
Each letter always appear in the same location relative to the image of the net and where they appear corresponds with their position on the keyboard. For example the letter A will appear to the left of the net, W appears above the net, D appears on the right side of the net and S appears below the net.
Pressing the incorrect key, e.g. pressing W on keyboard when the letter A is on the screen will cause damage to the net.
Repairing Nets
To repair a damaged net you must return to a port and use the Dock menu where you purchase nets, lines and bait the lines. It will display any damaged nets and you can pay to have them repaired.
If the net becomes so damaged that it turns completely red then it will become destroyed and consequently lost and a new net would have to be purchased to replace it.
It is currently not possible to have crew members repair or mend any damaged nets.
Crab Pots 
Description
Fishing for King Crabs is only available by having the King Crab DLC.
King crabs were earlier in the northern Pacific, from the Japan Sea in the south to Kamchatka Peninsula in the north.
Catches of king crab are carried out using special crab pots from July to October. There are two sizes of crab pots found in this game.
Small pot can catch up to 100 king crabs.
Big pot can catch up to 250 king crabs.
Crab pots has to be picked up within 48 hours after it is set, or the crab will start to rot and eventually your pot will be lost.
Setting a small pot 
To set a small crab pot, you need to go in first person and grab a pot from your pot stack, then place the pot onto the sorting table.
Bait the crab pot by taking bait from the bucket and then place it inside the pot.
Now you can set your crab pot, by pushing it into the sea.
A crab pot should stay in the sea for a minimum of 20 hours before you pick it up.
Hauling a small pot
To haul your crab pot, position your boat close to the buoy. When marked area is lit green, you can pick up the pot.
When pot it hauled up along the side of your boat, pick up the pot and place it down onto the hatch in the middle of your boat.
Open the pot hatch, then empty the crab pot onto the sorting table. Hold down the interactable button to empty it.
After the pot is emptied, you must stack your pot at the back of your boat.
Setting a big pot
To set a big crab pot, you need to go to the controlpanel on the workdeck, then you need to use the crane to deploy the pot onto the hydraulic lift.
Bait the crab pot by taking bate from the bucket and place it inside the pot, either by your own or set one of your crew member to do that task.
Now your crab pot is set to be deployed into the sea, by raising the lift.
Hauling a big pot
To haul your crab pot, position your boat close to the buoy. When marked area is lit green, you can pick up the pot.
When pot it hauled up along the side of your boat, pick up the pot using the crane and place it down onto the lift.
Open the hatch of the crab pot and use lift to empty crab pot onto the sorting table.
Sort king crabs
Sort all the crabs, by picking up each of the crab and check if its a female or male crab.
You must only store male crabs by putting them into the hole on the right side of the sorting table.
When crabs are sorted, you can bait the crab pot to set it again, or use the crane to stack it.
Throw all female crabs back into the ocean. Storing female crabs will give you a fine when delivering your catch at ports.

Trawling
Trawlers are not allowed to fish within 12 M of the shoreline. To use trawlers, you need to drive up to the north-west of the map marked with a green circle, where you will be able to head for the open ocean to catch the bounty of the Barents Sea. Trawling involves a boat pulling a net beneath or behind it through the water as it drives, usually using a form of sonar to find large groups of fish to trawl through, and to monitor how full the net already is.
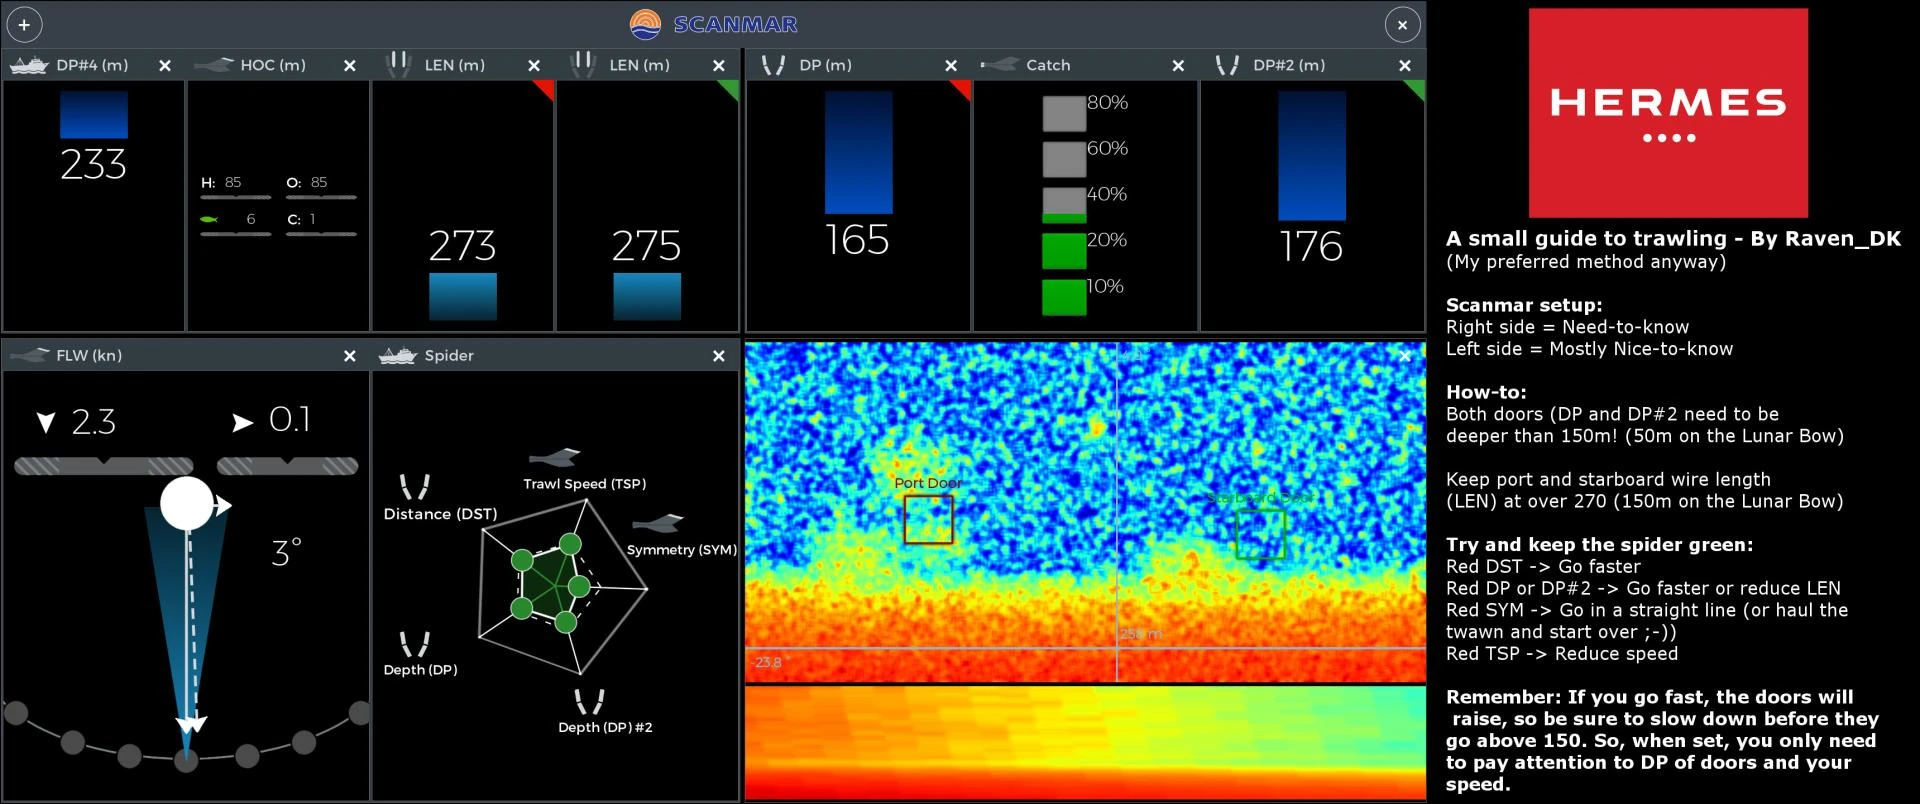
Trawling becomes available when you acquire the Lunar Bow and Hermes, they are the only boats capable of trawling.
Scanmar system
Both trawlers are fitted with the Scanmar catch control system. Scanmar is a pioneer among producers of catch control systems and offers commercial fishermen equipment for increased efficiency and financial gain.
Scanmar was established in 1980, at a time when there were major problems in the entire electronics industry, particularly among fisheries. As in all other industries, most vendors copied each other and there was a wide range of echo sounders and sonars from numerous suppliers, but little innovation.
It was obvious from the start that there was a need to control the trawl bag’s depth in relation to the location of pelagic fish, filling of the bag, and temperature of the water at the depth being fished. Scanmar developed robust technology for the hydro-acoustic transmission of signals, and sensor electronics were completely encapsulated in a newly developed plastic material.
The products were a success and were soon in use in most of the world’s fishing nations.
Sensors
You have some default sensors and can buy sensor upgrades in the port of Hammerfest.
Colored sensor markers mean:
![]() Red = Port door
Red = Port door
![]() Green = Starboard door
Green = Starboard door
Default sensors:
When you start on Lunar Bow and Hermes, you have a default range of sensors you can use. You can customize the screens back at the controldeck in both trawlers.
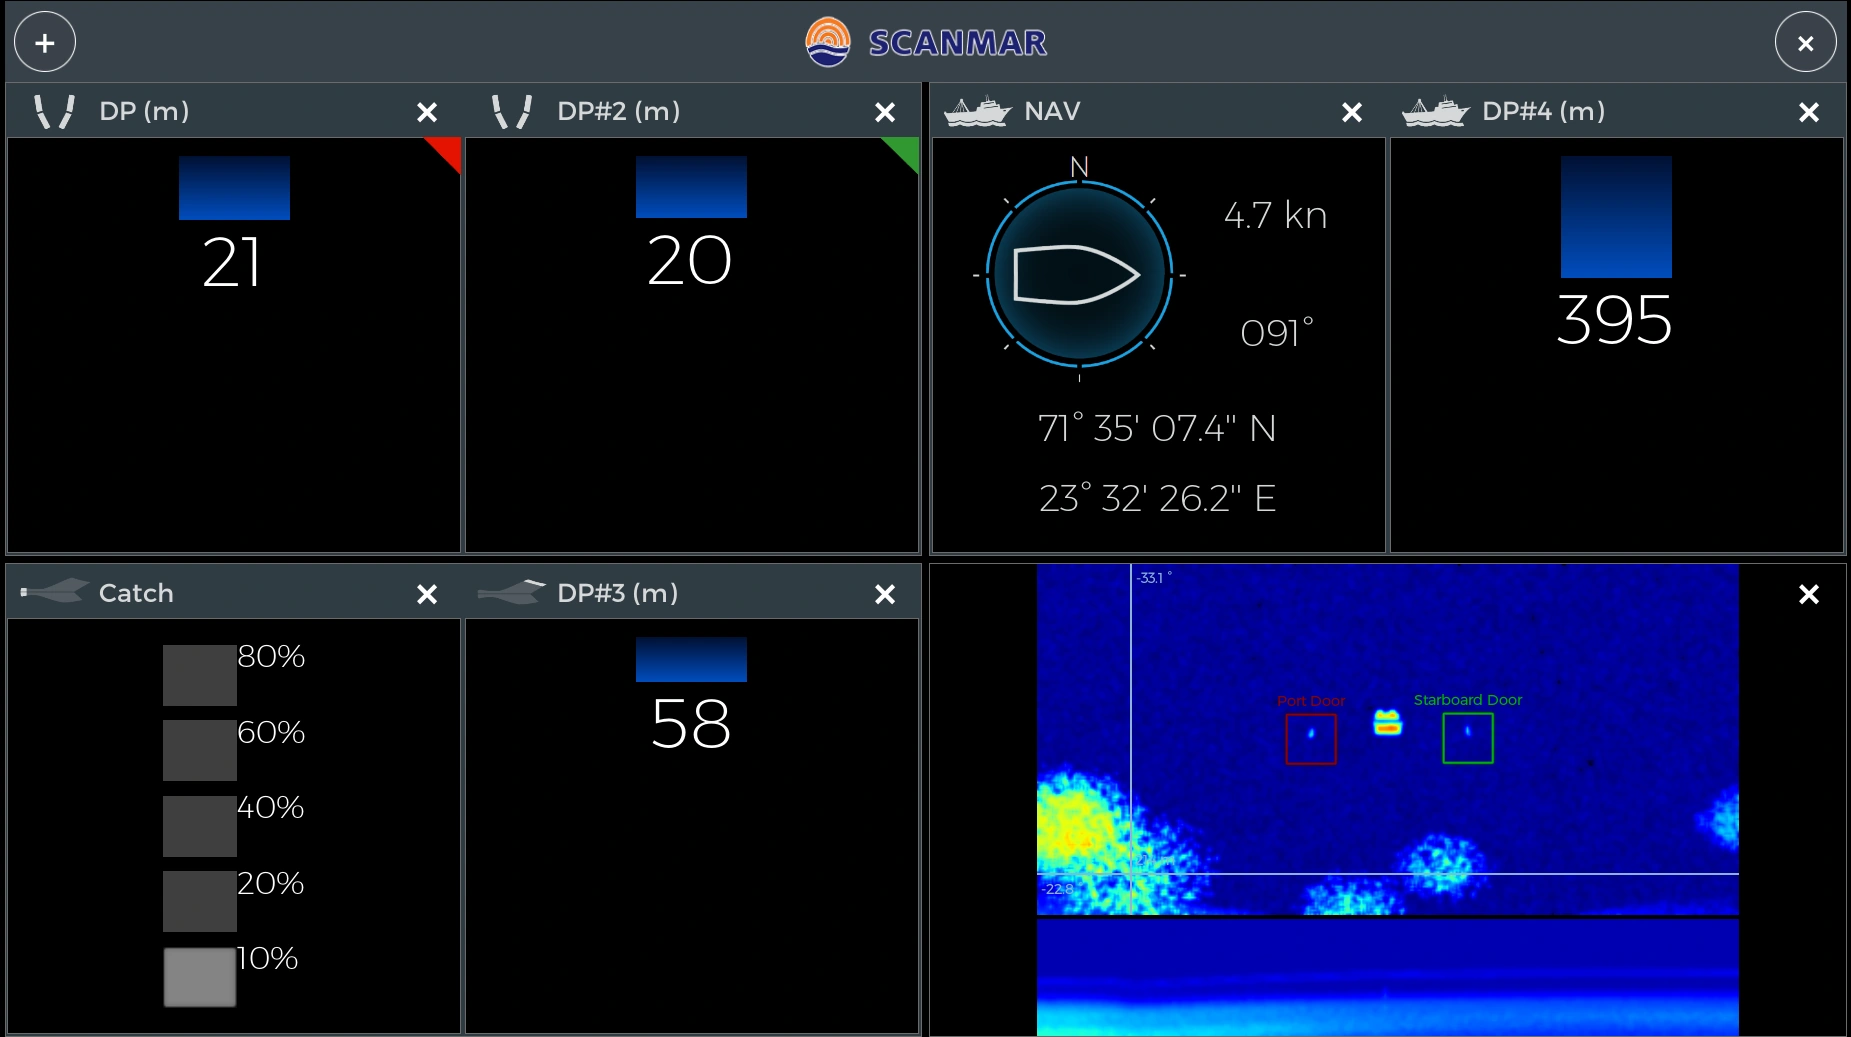
Forward Sonar, Headrope = Shows schools of fish ahead of ship – a marker will show which schools of fish, that are closest to your ship
Depth (DP), Door = Shows trawl door depth (#2 is second trawl door)
Depth (DP) #3 = Shows trawl bag opening depth
Depth (DP) #4 = Shows distance to seabed
Flow (kn) = Shows the speed of the waterflow into the trawl opening
Length (LEN), Door = Show warp wire length to trawl doors
Navigation (NAV), Ship = Shows ship course, knots, and latitudes
Temperature (TMP), Ship = Shows water temperature
Temperature (TMP), Headrope = Shows water temperature in trawl bag
Tension (TNS) = Shows warp wire tension
Tilt (TLT), Codend = Shows angle and rotation on trawl bag end (#2 is second sensor)
Tilt (TLT), Door = Shows angle and rotation on trawl doors (#2 is second trawl door)
HOC = Shows headrope, trawl bag opening, and clearance from seabed of trawlbag
Forward Sonar
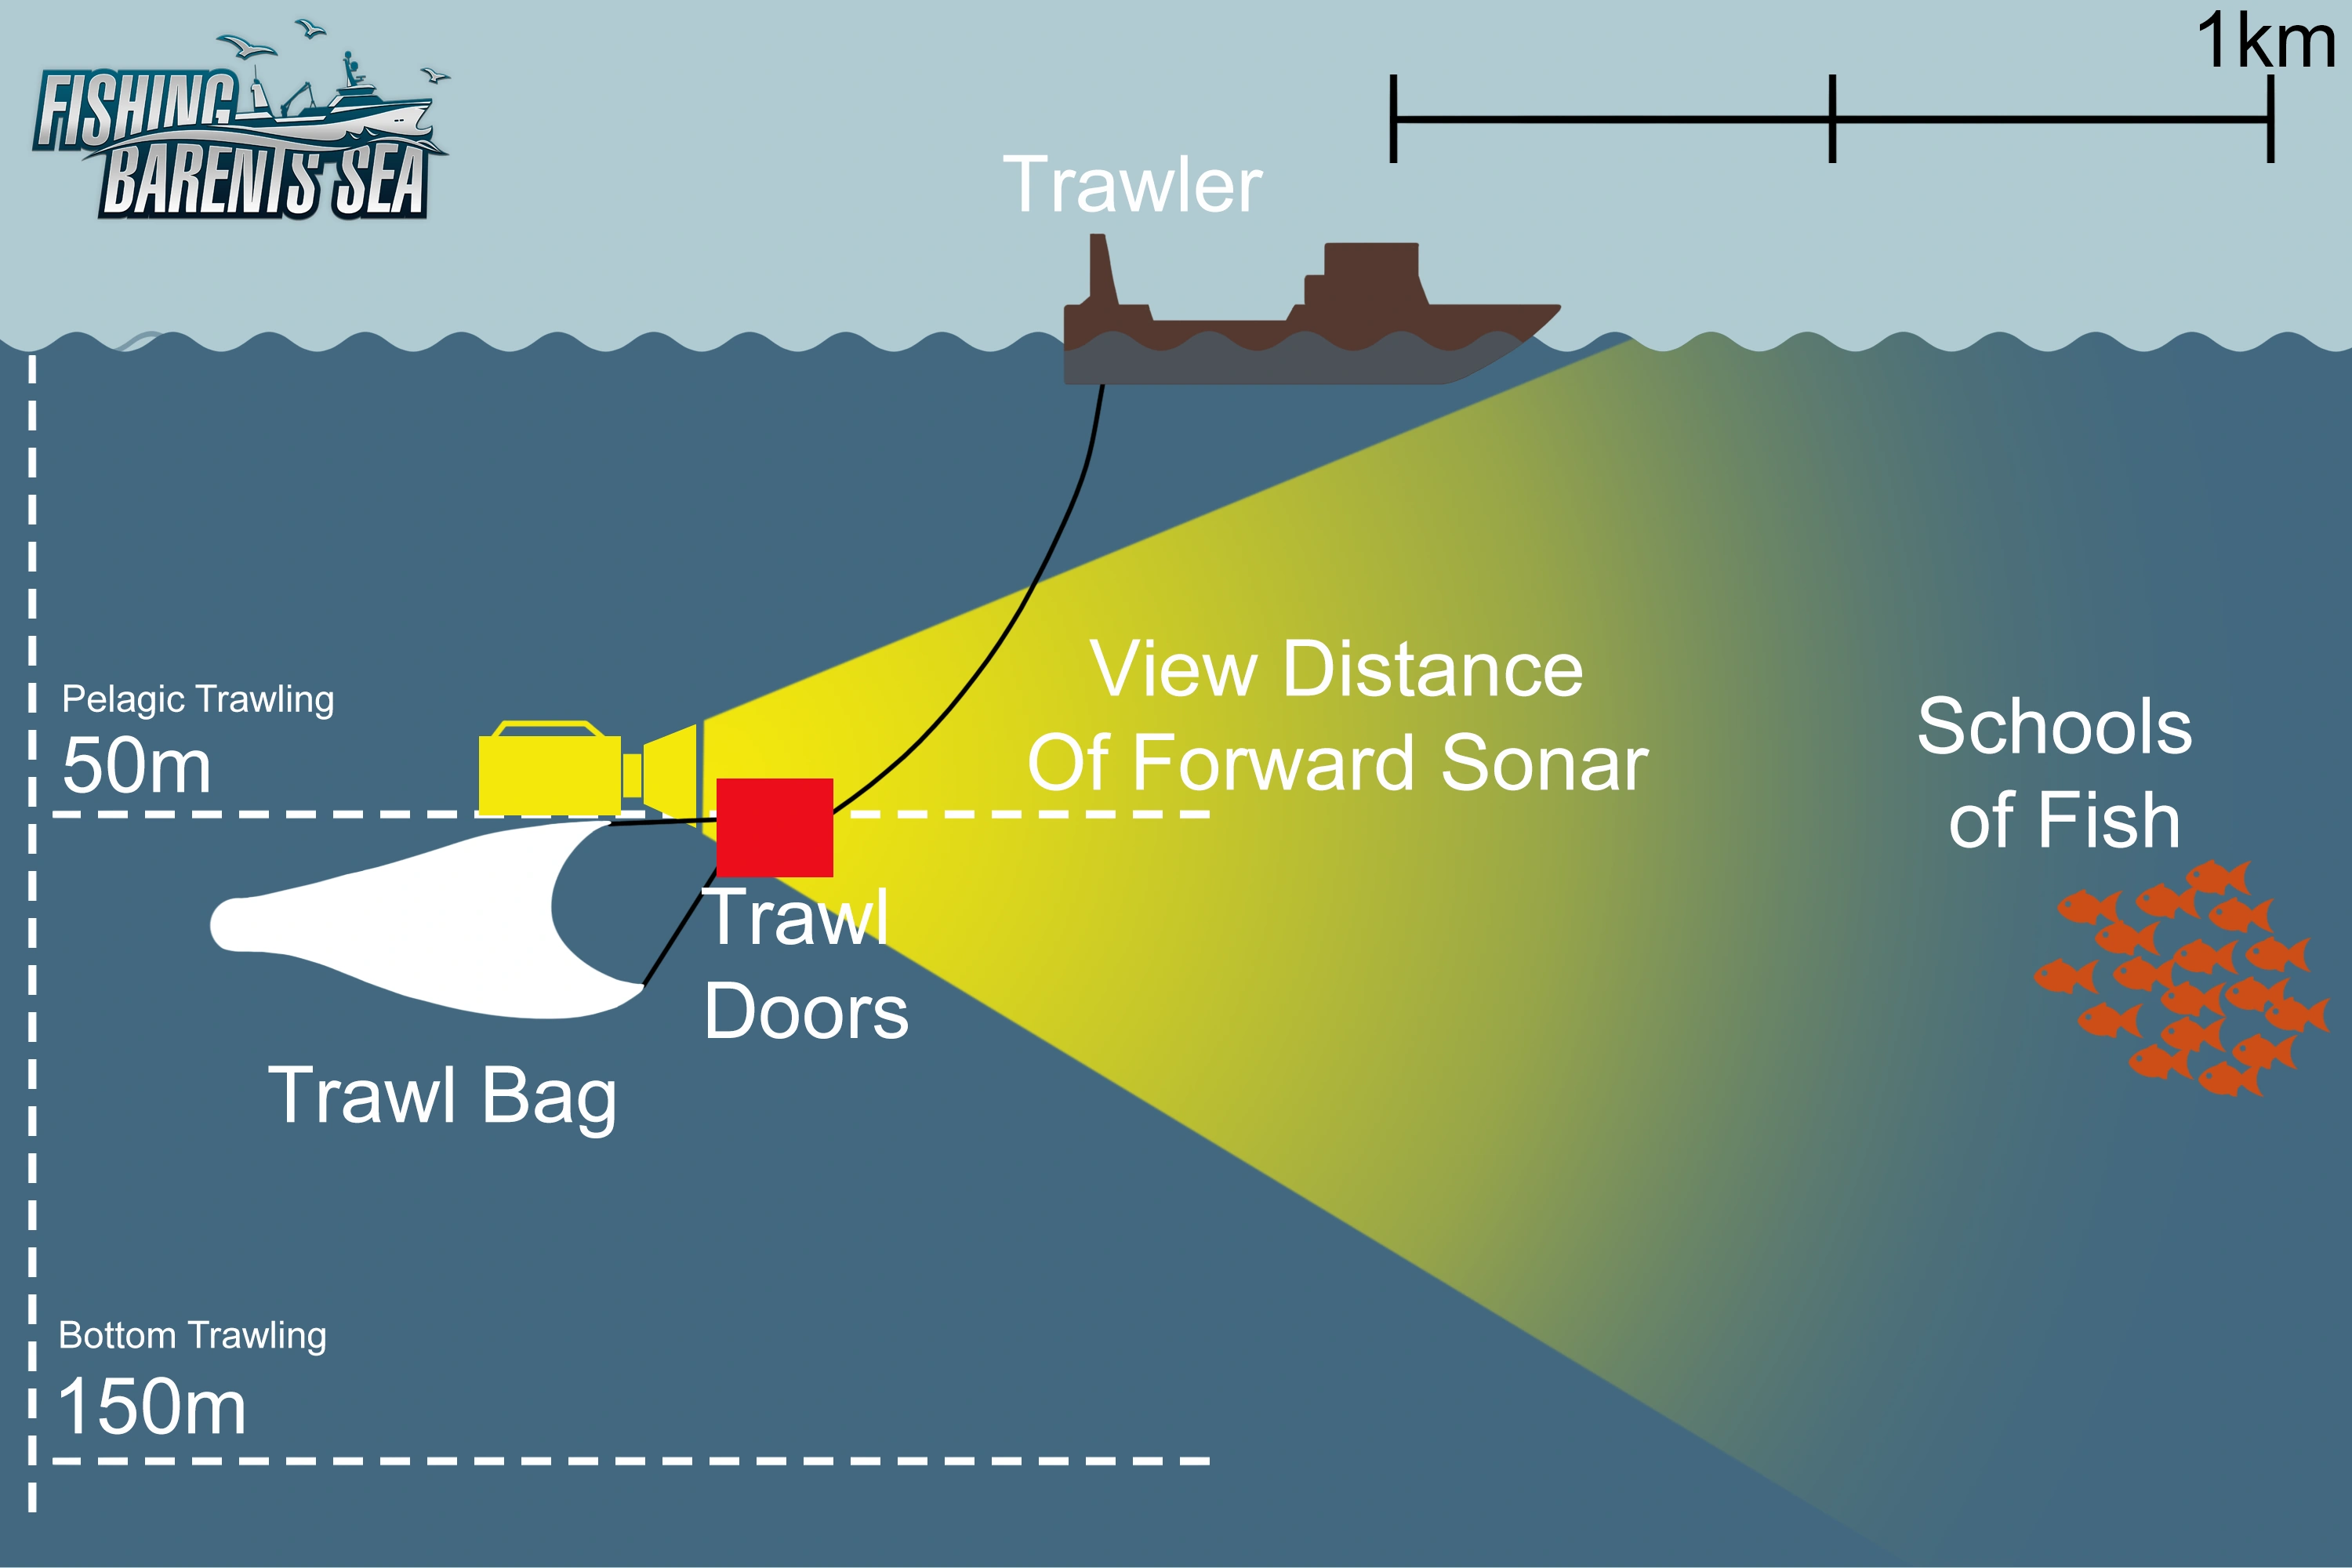
Forward sonar is placed on the headrope of the trawlbag, projecting any schools of fish shown 1km in front of your boat.
Trawl doors has to be at 50m depth or more to catch fish using Lunar Bow. Using Hermes, the trawl doors has to be at 150m depth or more.
Upgrade Sensors
You can buy these sensor upgrades in the port of Hammerfest.
![]() Door Sensor & Control = Shows the distance between the trawl doors and gives you a small amount of control left and right using the arrow keys.
Door Sensor & Control = Shows the distance between the trawl doors and gives you a small amount of control left and right using the arrow keys.
![]() Catch Sensors = Shows how full the trawl bag is. You need 5 sensors along your trawl bag to see the fill rate up to 80%.
Catch Sensors = Shows how full the trawl bag is. You need 5 sensors along your trawl bag to see the fill rate up to 80%.
![]() TrawlEye = Shows the rate of fish mass entering the trawl bag. Measures the height of the trawl bag opening from the headline to the footrope, as well as bottom contact or clearance.
TrawlEye = Shows the rate of fish mass entering the trawl bag. Measures the height of the trawl bag opening from the headline to the footrope, as well as bottom contact or clearance.
Trawling Guide
Pelagic trawling
Lunar Bow does pelagic trawling, dragging the net along the upper layers of the water column, catching mainly Mackerel and Pollock.
Using pelagic trawling: Trawldoors needs to be at 50m+ before you start catching fish. (DP and DP#2 sensor shows trawldoor depth)
Habitat damage: Pelagic trawls don't come into contact with the seabed, so are not associated with damage to marine habitat.
Bycatch of vulnerable species: Pelagic trawls may unintentionally catch vulnerable species. An example is pair trawls that target seabass in the English Channel. This fishery has been under scrutiny for catching dolphins as they trawl.
Discards: Pelagic trawling for a particular species can be associated with the capture of non-target fish and other marine life and the accidental catching and discarding of juvenile commercial fish species can impact these populations. However, bycatch levels are typically lower than in demersal trawls.
Bottom trawling
Hermes does bottom trawling, dragging the net along the seafloor, catching all types of fish except Mackerel.
Using bottom trawling: Trawldoors needs to be at 150m+ before you start catching fish. (DP and DP#2 sensor shows trawldoor depth)
Bottom fishing has been conducted for over a century on heavily fished grounds such as the North Sea and the Barents Sea.
While overfishing has long been recognized as the cause of major ecological changes to the fish community, concern has been raised more recently about the damage benthic trawling inflicts upon seabed communities.
There are no coral reefs in the Barents Sea, but other species are vulnerable to being caught in bottom trawling. In the Svalbard region of the Barents Sea, two thirds of the survey stations were classified as having low vulnerability to bottom-trawling.
The fisheries in the northern Barents Sea and Norwegian Sea, including the marine areas around Svalbard, are among the best-regulated fisheries in the world.
Additionally, there are many protected areas already established around Svalbard to safeguard ecological biodiversity.